Table of Contents
Introduction
In this post, I’ll explain how to easily create a simple attendance management system using Google Apps Script and Google Sheets. This system will let users clock in and out via a web page, and log their time entries in a Google Sheet.
While there are many expensive time and attendance software options available, you can create an effective system for your company or your students in just a few minutes.
Sneak Peek
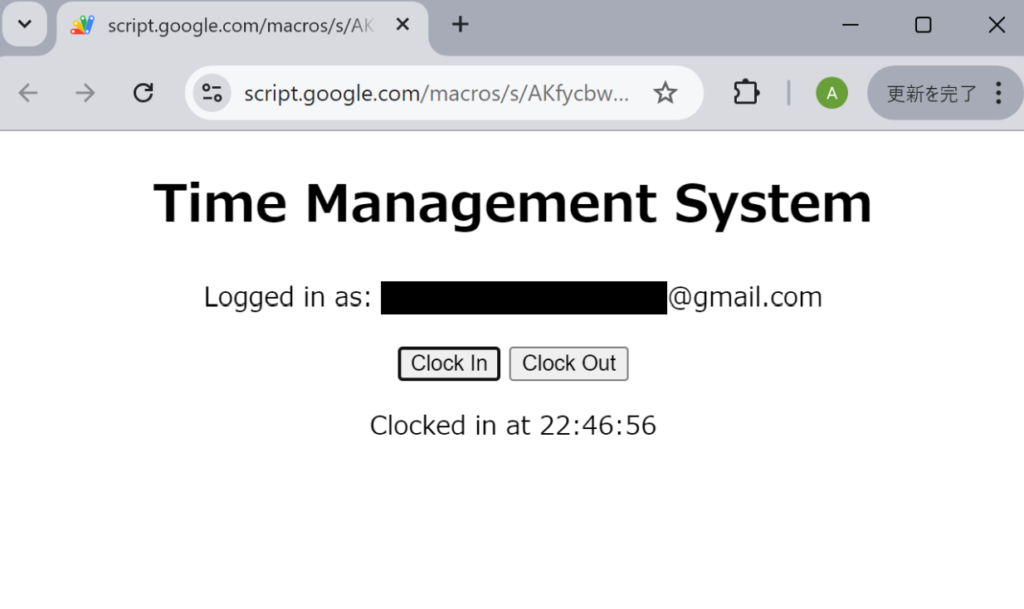
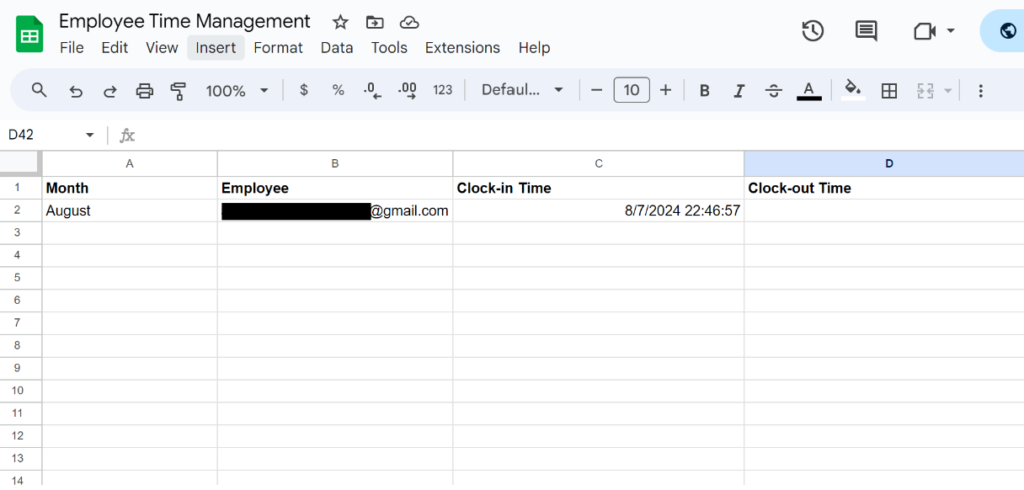
Here’s what our time and attendance software will look like! The first image below shows the web page where users can clock in and out. When they open the page, they’ll see their Google email address along with the options to clock in or out. When they click one of these options, the clock-in or clock-out time will appear, and their Google email address, along with time, will automatically be sent to a spreadsheet (second image), allowing us to track their attendance.


Setting up a Google Sheet
For this system to work, you need to set up a Google Sheet with the necessary structure to store the data of our users. To do so, create a new Google Sheet and keep the original name of the first sheet “Sheet1 and include the following columns:
- Month (to easily filter by month)
- Employee
- Clock In Time
- Clock Out Time
Ensure that the spreadsheet’s share settings are set to “Anyone with the link” and “Editor.” This allows the data of our users to be added to the sheet through the web page.
Setting Up the User Interface
From your Google Sheet, access Apps Script by going to ‘Extensions‘ > ‘Apps Script‘.
After accessing the Apps Script editor, create a new HTML file by clicking the “+” button and name it “Index.html” Then, insert the code below to build the user interface that users will interact with when they access the web page.
<!DOCTYPE html>
<html>
  <head>
    <base target="_top">
    <style>
      /* center the content */
      body {
        text-align: center;
      }
    </style>
    <script>
      // Displays user email address in "UserEmail" paragraph
      function setEmail(email) {
        document.getElementById('userEmail').innerText = 'Logged in as: ' + email;
      }

      // displays the date after clocking-in/out in "statusMessage" paragraph
      function showStatus(message) {
        document.getElementById('statusMessage').innerText = message;
      }
    </script>
  </head>
  <body>
    <!-- content of our web app -->
    <h1>Time Management System</h1>
    <p id="userEmail">Loading user info...</p>

    <!-- buttons that run showStatus after running ClockIn/ClockOut -->
    <button onclick="google.script.run.withSuccessHandler(showStatus).clockIn()">Clock In</button>
    <button onclick="google.script.run.withSuccessHandler(showStatus).clockOut()">Clock Out</button>

    <p id="statusMessage"></p>
    <script>
      // retrieve user email on page load
      google.script.run.withSuccessHandler(setEmail).getUserEmail();
    </script>
  </body>
</html>
Understanding the Code
- The <body> element displays the necessary content on our Web Page.
- The google.script.run.withSuccessHandler(setEmail).getUserEmail() line runs a server-side function called “getUserEmail” to retrieve the email address of the user accessing the web page. This email is then displayed in our “UserEmail” paragraph using the setEmail function.
- When the Clock In/Out <button> is clicked, it triggers the server-side “ClockIn” or “ClockOut” functions, which update our spreadsheet and return the current date and time. Upon successful completion, the ShowStatus function is called to display the date and time in our “StatusMessage” paragraph.
Implementing the Server-Side Script
Next, we need to implement the server-side functions that will handle the logic for clocking in and out, retrieve the user’s email address, and interact with Google Sheets to log the timestamps. To do this, create a new file by clicking on the “+”, selecting “Script”, and then inserting the code below.
// doGet method to display our html in web app
function doGet(e) {
  return HtmlService.createHtmlOutputFromFile('Index');
}

// get address email of user accessing the web app
function getUserEmail() {
  return Session.getActiveUser().getEmail();
}

//  returns clockIn date and time and updates sheet
function clockIn() {
  var email = Session.getActiveUser().getEmail();
  var sheet = SpreadsheetApp.getActiveSpreadsheet().getSheetByName('Sheet1');
  var date = new Date();
  var month = Utilities.formatDate(date, Session.getScriptTimeZone(), 'MMMM');

  sheet.appendRow([month, email, date, '']);
  return 'Clocked in at ' + Utilities.formatDate(date, Session.getScriptTimeZone(), 'HH:mm:ss');
}

//  returns clockOut date and time and updates sheet if ClockIn data is found
function clockOut() {
  var email = Session.getActiveUser().getEmail();
  var sheet = SpreadsheetApp.getActiveSpreadsheet().getSheetByName('Sheet1');
  var date = new Date();
  var lastRow = sheet.getLastRow();

    for (var i = lastRow; i > 0; i--) {
    if (sheet.getRange(i, 2).getValue() == email && !sheet.getRange(i, 4).getValue()) {
      sheet.getRange(i, 4).setValue(date);
      return 'Clocked out at ' + Utilities.formatDate(date, Session.getScriptTimeZone(), 'HH:mm:ss');
    }
  }
  return 'No clock-in record found to clock out.';
}
Understanding the Code
- GetUserEmail retrieves the email address of the user accessing the app and passes it to the “SetEmail” function in the UI code.
- ClockIn and ClockOut gather the necessary data (email and date) to update our sheet and return the clock-in or clock-out date and time to the “ShowStatus” function in the UI code.
Deploying your Web App
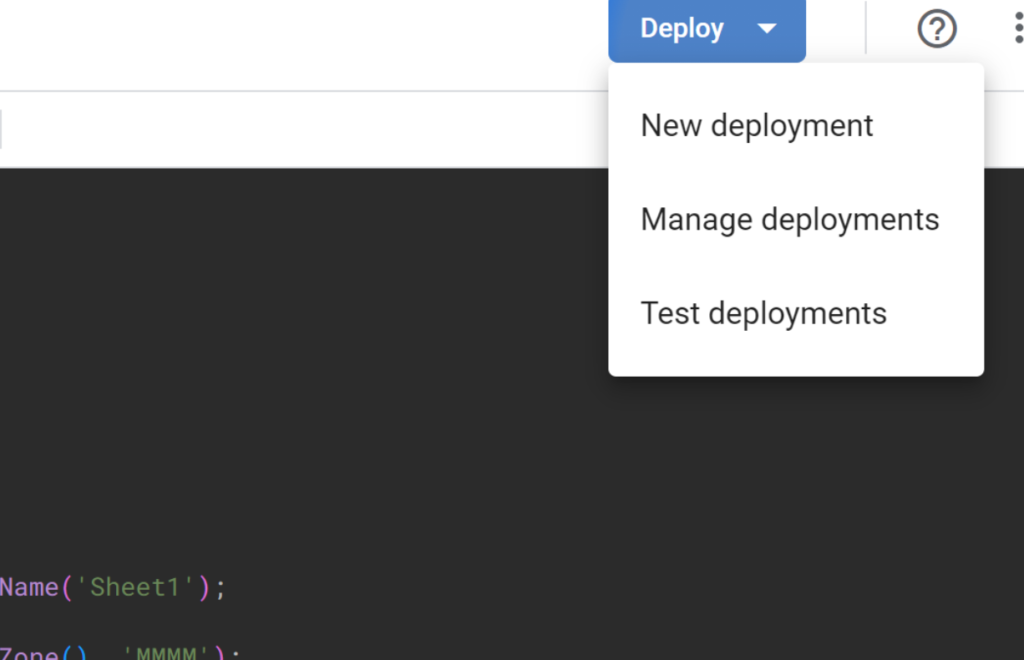
To create your web page, click on “Deploy” > “New deployment” from your Apps Script page.

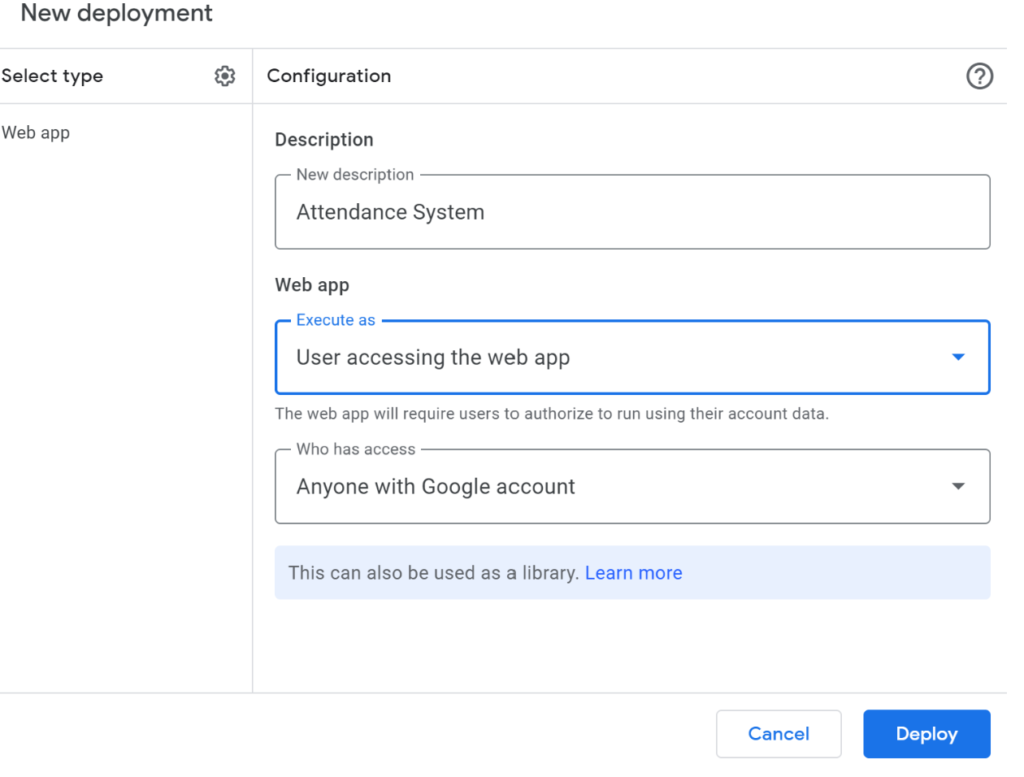
Click on the gear icon in the top left corner and select the “WebApp” type. Then, rename your WebApp and set it to execute as “any user accessing the app” Allow access to “Anyone with a Google account” After clicking “Deploy,” you’ll receive a link to your web app that you can share with your employees or students.

Conclusion
And that’s it! Your time and attendance software is ready to be used. Simply have your employees or students open the web app link whenever you need to manage their attendance.

0 Comments